
The timeless smell and tangy taste of apple pie. You know fall has arrived when apple treats begin to spawn all around; candied apples, caramel apples, apple pie, apple turnover and of course apple cider. An apple treat that I stumbled across in my cookbooks over the summer resulted in a crowd pleasing favorite. Imagine apple pie made into a cake. Whimsy prompted me to choose this recipe for which I had never tried prior to the Fourth of July holiday and has since become the most requested meal of a dessert.
Not only was this apple pie in a cake, but this beauty is also gluten and dairy free. One of the many recipes I have modified for my best friend if we are to partake in gluttonous activities together.
If you are a fan of crumb cake, coffee cake, apple pie and or all of the above then this recipe is for you and surely to become a hit for whatever event you plan to cater. Most recently I was called upon by my husband and son to subject a gaggle of six and seven year old boy scouts (and their dads) to my creation. Wanting to exceed their wildest expectations I modified the recipe even further.
 While the recipe calls for 3 peeled and cored apples I went a step further, as I did in my original rendering, and used 4-5 medium-large apples. The more sour the more sweet the cake is as well, so I chose some of the finest organic granny smith’s this go around. Doing so results in a mouth orgasm of epic proportions as the moisture of the apples wicks into the batter for a moderately viscous, tender cake treat. Pretty much the cake melts in your mouth for anyone lacking imagination.
Choosing not to peel my apples as well because I think the skin adds a natural beauty, crunch if exposed just right at the crust while baking, plus I would rather not waste some of the best parts of the apple. I also did not core my apples but opted to chop and then clean up the flesh housing the seeds, again not wanting to waste precious apple.
Prep your pans by misting with non-stick spray and dusting lightly with flour. Again, I modified this from the original recipe as I was catering to a citizenry of boy scouts and their fathers (my husband and son included) so we opted for cupcakes. The original will call for a tube pan.
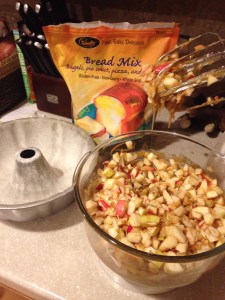
 During my chopping session which yields a great amount of pleasure and stress relief, our oven is becoming moderately warm (325*F). Prepping two bowls, one for mixing and one for the apples I start to combine some of our ingredients.
Entertaining two bowls in the baking process is helpful if you will be looking to sift flour, as you are combining and allowing certain ingredients to mix; the sifting can be performed during this time to maximize aeration of your dry ingredients. In my first bowl I have three (3) eggs that have been resting at room temperature, I can achieve a great amount of whip and volume in our cake using this logic. At this point I have only added half of the called for granulated sugar, three quarters of one cup (total recipe calls for 1 1/2 cups of sugar), to our eggs. The other half has been sprinkled and tossed about in our apples. Why? You ask. The sugar will coat our apples and wick out the juices creating a wonderful glaze and aqueous rendering.
Continuing to beat our eggs…at a medium pace…add in 1 1/2 cups of vegetable oil, I opt for 1 cup of coconut oil and 1/2 cup of olive oil for the moisture. You may do as you wish and choose the full amount of either. Still mixing, fold in a half cup of packed, light brown sugar. When the mixture is smooth and creamy pour in the vanilla extract one teaspoon at a time for a total of two. Your wet ingredients should resemble a caramel color and be ready for the apple infusion; slowly add the apples to your partially completed batter, the chunks will cause bumps in the blending process however they will begin to coalesce.
 Lastly our dry components to our apple masterpiece. I mentioned gluten free so hold onto your shorts before they get into a bunch. Gluten free doesn’t always have to taste like cardboard and in fact you could use standard flour, again, I like to not eat alone just as alcoholics like to drink with a crowd. Using your finest sieve filter together two (2) teaspoons of cinnamon, one half (1/2) teaspoon of nutmeg, one (1) teaspoon of baking soda and three (3) cups of flour. I modified mine, using 1c coconut flour and 2c Pamela’s Artisan flour.
Slowly fold in these final elements until well blended. Your mixture should be a bit sticky, partially lumpy with your apples, yet exuding an awesomeness in aroma before even hitting the oven.
Using cupcake pans cut my cook time in almost half, bake these beauties until the top springs back when lightly pressed with your finger. Please do so with caution…I would rather not be held liable for your burns and shortcomings. If using a tube pan, prepare for 75-80 minutes if you would like to use a traditional timer, if going for cupcakes, allow at least 30-35 minutes. Cool for 25 minutes (for tube pan) and 5-10 minutes for cupcakes and transfer to a wire rack.
Finishing touches should be a caramel glaze:
3 T: butter, granulated (or turbinado) sugar, brown sugar, heavy (whipping) cream and 1/2 tsp vanilla. Boil for a minute and remove from heat and spoon over the cake.
My finishing touch, again…modified was a cream cheese caramel glaze. Using the caramel glaze above, substituting milk for the cream and blending while still hot with two (2) ounces of cream cheese and one cup of powdered sugar.
Most excellent with coffee. ENJOY!

 What you will need to start with is chicken. As little as one pound of chicken should do it and you can have it as a mixture of ground chicken breast and chicken thighs. Call me sexist but I love some really good thighs; tender, juicy, and full of amazing flavor. Your local butcher can also assist you in this as he might be doing the majority of the work for you. However, if you happen to have a meat grinder at home, voila, you can accomplish this at home on your own. The butcher will be more than happy to grind this for you upon your request, they are one of the least utilized experts in stores. If you can wrangle a butcher they will share with you a great deal of secrets, if you befriend one, well then you have additional added benefits.
 Lightly sprinkle the seasonings across the top of the meat, leave some aside as you will begin to turn the meat and sprinkle alternately so that all of your chicken is evenly coated. Continue to do this until all of your meat is thoroughly covered and mixed together. Feel free to continue to mix if need be to ensure all of your chicken is clad in these warm spices. Once you have encased all of the meat in the chorizo seasoning mix, place in a separate container to be refrigerated overnight. Your seasonings will begin to soak in and enhance the chicken for that authentic chorizo taste. You can roll into a ball and wrap with saran wrap, butcher paper, freezer paper, or place in Tupperware. After sitting at least overnight, we prefer a solid 24 hours, your chicken chorizo is ready to serve up.
 Frying up my chorizo and scrambling some egg whites I wanted a carb. Knowing full well I was headed tot he gym for some weights and cardio I wanted to prep my body for the nutrients needed to sustain 90 minutes of intense exercise. I opted for some sweet potatoes. None like the sweet potatoes we have all been accustomed to at Thanksgiving dinners. You see those are called a yam, we however, interchangeably use the term sweet potatoes because they taste sweet. Sweet potatoes can have a hannah white, pale flesh and are loaded in vitamin A, biotin, vitamin C, they help regulate your blood sugar and are a healthy carbohydrate because of the amount of fiber and your body will thank you for all the anti-inflammatory, anti-fungal properties. I digress on the health aspect. The sweet potatoes and chorizo might be a meal to scoff, but please leave the guffaws until after you whet your palette with this sweet and spicy fall dish. Better yet, have it any time of the year if you happen to have a local butcher who would be kind enough to whip up a batch of chicken chorizo for you.
 After shredding I tossed them into a large frying pan that had been coated with coconut oil. Another super food I absolutely adore that you can use for anything and everything. Smoothies, baking, frying, or if you are like me a shot all by itself, but I am a fan of coconut so I don’t mind the taste or the smell I have found it to really accentuate my cooking on all levels when used properly.